Monday, April 29, 2013

Heat-Proof Makeup...

Happy Monday bloggers :) I don't know about the rest of you, but I am feeling the Monday blues. Not so much sad, but just soooooo tired. Why do you do this to me Monday?!? :O I'm sure it didn't help that when I got to work this morning, our AC unit was broken, so the building was hotter than ever...yuck!

Speaking of hot, now that Spring is here and in full force, the weather in FL has started to heat up lately. I think all week it is suppose to be in the high 80's here, phew! I hate to wear a full face of makeup when it is that hot, especially because it feels cakey and piled on. Not only that, but it tends to slip off more, move around, and just look like a plain ole' mess on your face. So what to do? Here are some quick and easy makeup secrets for hot weather:


Always wear a primer! using a primer under your foundation helps your makeup to last all day. Look for a primer that contains silicone (the major ingredient in most long-wearing formulas), which will act as a super shield between humidity and your skin.

 Pick the right foundation! As mentioned previously, silicone is a prime ingredient that helps makeup stay on longer; they are the very best option when met with moisture. Make sure to also see if it includes SPF, you don't want your face to burn!

 A good concealer! Not only just with mascara, but especially with concealer, you want to choose a waterproof formula; this will hide dark circles and blemishes, even in extreme heat.

 Mind your eyes! You still want your lashes to look fabulous, so let's make sure to wear a waterproof mascara and liner (if preferred). I always tend to skip the liner because I have smaller eyes, but if it is something you can't live without, go for it!

 If you are one who has oily skin and you have to touch up during the day, use blotting cloths (I like these best from Neutrogena click here). Most days it is just easy to touch up with powder, but the hotter the weather, the cakier the powder will make your face!

Monday, April 22, 2013

Tightlining your eyes...

Happy Monday bloggers :) The weather has really been dreary lately, mostly cloudy and rainy...seems like FL Spring to me! (hehe) Today as I was doing my makeup, I really decided to make my eyes pop by tightlining under my top lashes. I didn't know about doing this trick until last year, and really only knew of lining the waterline. So why tightline?

Tightlining your eyes (or you could call it "invisible eye liner") is a great way to add definition to your eyes. Instead of lining the skin above your lashes (which many of us still have to master), you line between the lash line. This method is perfect for any casual or fancy occasion, and is super easy to master.


Step One: If you're a beginner at tightlining, using clean fingers, gently lift your lashes upward. You'll see tiny gaps between your lash hairs, which you'll be filling in with eye liner. Once you have become a expert at tightlining, you won't have to lift up your lashes and just simply draw on the line.

Step Two: Using your eyeliner, draw the eye liner directly under each individual lash (as close to the root as possible), to fill in your lash line. This technique helps to make your lashes look fuller.

Tada! Now you have officially learned how to tightline :) If you'd like to intensify the look, tightline your bottom lash line as well. It's the same concept as the top, but you'll be filling in the space between your lower lashes.

Friday, April 19, 2013

DIY Earring Holder...

Happy Friday everyone :):):) It has been a little bit since I have updated on here, but I have been thinking of blogs to write and taking a little relaxing time for myself <3 This weekend coming up hopefully won't be too eventful, but I am suppose to have dinner with family and friends, which will be awesome :) I should also give my doggies a bath :x

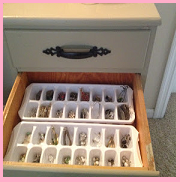
So lately I have been buying more and more earrings, and I am running out of room to store them! If you have this same problem, I have a quick and easy DIY solution: an earring drawer! Here is all that you need:

An empty shelf in a night stand or a empty spot in a dresser drawer
Cute ice cube trays

Take your favorite designed ice cube trays; they could be regular squares, or a cute design like hearts, stars, or smiley faces :)

Lay the empty ice cube trays in the drawers side by side, or however they will fit, and put a pair of earrings in each 'cube' slot. The slots keep all the earrings organized and easy to view when you are choosing which ones to wear <3

Wednesday, April 10, 2013

Top Favorite Nail Designs...

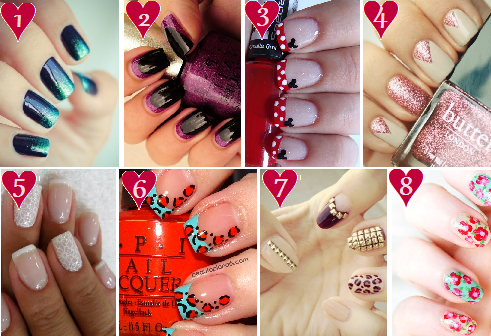
It's Hump-Day everyone! happy mid-week to you, and I hope this week is going well so far :) Today I wanted to post a fun blog about some of my favorite nail designs. I have been really into doing my own nails lately (just to save a buck), and there are some really cute nail designs that I have found on Pinterest to try and replicate on myself. If you don't know about Pinterest, it's a website where people can share and pin any and all favorites they have...makeup, hair, food, crafts, fashion, you name it. When I visit the website, I can seriously get lost for days just browsing through everything. Some of my favorite pins are those of nail designs, so here are my current top favorites!


1. Ombre: Any ombre nail is awesome. It seems like the darker the colors you use, the more of a 'twilight' effect it gives. Add a little glitter and it's like you're looking into the galaxy on your nails. Genius!
2. Dark: These dark nails are a bit different, as they have a pop of color on the bottom of the nail near the cuticle (most people put the color on the tip like a french manicure design). This design is not only different but it gives the nail a unique look to it. I'd say dark and sexy!
3. Event: Any kind of event you are going to, it is always a cute idea to design your nails to fit that event. This one is obviously going to Disney as they have little Mickey Mouse's on each nail. I like this because it also keeps it simple. You don't have Mickey's entire face over each nail, or any of the Disney character's walking all over your nails, it's a cute, simple, and chic design!
4. Glitter: Glitter in my book is always good, no matter what the design or color. Here they have also kept the pop of color on the bottom, but using a glitter polish. Most people tend to do one accent nail (the fourth finger here), but when you incorporate that pop of color through all the nails, it really brings the design all together.
5. Simple French: Most french designs always look chic and classy, but they can often be a little boring....no color, no design  just white or pink. To spice it up a little, this design added a nail sticker design to the fourth finger. It still works with the theme because the design it also white, but it just adds a little something extra. This would be great to do for a formal event like a wedding!
6. Leopard: Sometimes using a leopard print can be too much on the nails. Most people tend to put the print all over the nail, which always seems like there is too much going on. This design used the classic french manicure but with blue tips instead of white. They also incorporated the leopard of the sides of each nail and using a pop of red. So cute! If this is still too much on the nail for you, you can always just add the print to one nail instead of all.
7. Studs: This is one of my favorite designs, not only because it's using purple, but it also incorporates leopard and studs! This design comes off very sexy and sophisticated. It has a sense of simple but stylish, and it matches my current cell phone case. Love it <3
8. Flowers: Now that spring is here, who doesn't love flower print?! There are so many flower designs you could use for your nails, but this one to me captures spring. Just beautiful :)

Monday, April 8, 2013

A Dark Circle Remedy...

Good Monday Morning all :) This past weekend I was very productive....did some Spring Cleaning! I think I took on too much, but in the end it looked beautiful <3 We also took the dogs to a dog beach (I put up some pictures on Instagram); they loved it!

Today is one of those mornings I feel like I didn't get enough sleep...even though I slept a good 8 hours! Once I looked in the mirror, I noticed the bags and dark circles that needed to be covered up under my eyes...yikes! Why do we get dark circles anyway? both aging and heredity influence the development of dark under-eye circles, with allergies also playing a role. dark circles result from the breakage and leaking of delicate capillaries under the eyes. Although the leakage is not harmful, the pooled blood darkens to a purplish-brown color as it oxidizes; the extreme thinness of the skin in the under-eye area makes the bruising more visible. Gross, huh? Here is a good trick to reduce the sight of dark circles:


Green Tea Treatment: Take two used tea bags (from one you have already steeped and drank the delicious tea), squeeze out any remaining liquid, put them in a ziploc bag, and place them in the fridge. Leave the tea bags in the fridge for about an hour (you can put them in the freezer for faster cooling time). Take the cold tea bags and lie them on your closed eyes and dark circles for about 15 minutes (it's best to just lie down while you are doing this). Use green tea bags rather than bags with black or oolong teas; green tea has less processing than other types of tea, so it contains more beneficial polyphenols. Green tea also has anti-inflammatory properties and also contains catechins that are potent antioxidants and help to scavenge cell-destroying free radicals. <333

For a great video to watch regarding something similar, head on over to Farah's YouTube Channel: here

Friday, April 5, 2013

Get Rid of Stained Nails...

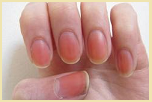
Good Morning Bloggers :) It's Friday and I am very excited to sit around this weekend and do nothing! Ha! Most likely not nothing, but at least try and relax for a little bit :) I went out yesterday and bought some new nail polish, and when I went to remove the nail polish I currently had on, I noticed my nails are all stained red...yuck! I certainly can't put a light or sheer nail polish on top of this, otherwise it would show through. What to do?!

Here are some quick and easy secrets to get rid of that pesky nail polish stain left behind by your bold colors:

Lemon Juice: Cut a lemon in half. Take one half and make a little hole in the middle of the lemon, enough to stick your finger in it. Take each finger and rub it in the lemon for a couple minutes; 5-10 (make sure you don't have any cuts or this will hurt!) Afterwards wash off your hands and buff out your nails to easily buff the stain away.

Peroxide: Take a small bowl and add enough peroxide in the bowl to cover your nails. You can always add water to half the mixture as well if you are worried about directly having peroxide on your nails. Dunk your hand in the bowl, submerging your nails, and leave for 5-10 minutes. Afterwards wash off your hands and buff out your nails to easily buff the stain away.

Nail polish remover: Take 10 cotton balls and soak them in nail polish remover. Then take a soaked cotton ball, place it on top of each nail, and wrap foil around it to hold it in place; do this for each nail. Let this sit for 5-10 minutes, remove all foils and cotton balls, and wash your hands. Buff out your nails to easily buff the stain away (this is a similar method salon's use to take off Shellac nail polish).

Wednesday, April 3, 2013

How to Avoid Razor Burn...

Happy Hump Day everyone :) I am feeling refreshed today! I have my bright spring colors on, my gold jewelry, my Easter color nails, and my new hair :) I am waiting on my new hair care products to arrive and I will let you know how they work....I'm excited!

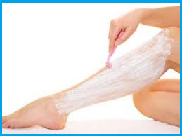
Today's blog I thought should be about something everyone gets.....razor burn! Ouch! It is always so painful, yet so hard to avoid! Especially now that we are coming into Spring, everyone is beginning to wear shorts, skirts, and dresses that show off the legs <3 Here are some secrets on how to avoid that awful burn:


Shave with lukewarm water: Water that is too hot causes your skin to become sensitive (temporarily) so before you even start shaving, your skin is already red and irritated. Hot water softens the skin, making it easy to slouch off all of the dead skin cells, exposing your new, fresh and sensitive skin cells that lie underneath.

Exfoliate the days you don't shave: Exfoliating the legs with a good scrub or sponge will expose all of those stubborn in-growns/trapped hair follicles and will make your skin feel smooth.

Use a sharp razor: With dull razors, we have a tendency to press harder on our skin and go over the area many more times than with a new razor.

Use a moisturizing shaving cream WITHOUT fragrance: Fragrance in skincare products can irritate sensitive skin, especially if you already suffer with dryness, eczema and other skin issues. It's also good to avoid common irritants such as alcohols, menthol and dyes.

Monday, April 1, 2013

Wash Your Hair with Beer...

Happy Tuesday everyone......April Fools! Happy Monday :) Today is one of my favorite days of the year, the day I got together with my amazing man. Happy Anniversary babe <3

I recently got my hair cut and colored (an updated picture is on Instagram), and I want to make sure I take proper care of it as much as I can. I have been researching different things I can do to keep my hair healthy, and one of them is a 'Beer Wash'. Sounds weird, but I think I'll give it a try! Here is what to do:


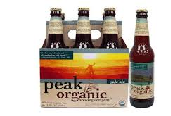
Take a can of bottle of beer (preferably organic beer), open it, and let it sit out for a little while to deplete the carbonation. You can either use the beer as a rinse after you have shampooed and conditioned (let the beer sit for 5 to 10 minutes and then rinse with lukewarm water), or simply mix it in with your shampoo. This mixture lathers very well and you’ll find your hair completely cleansed.

Beer is widely used in many hair treatments and is especially popular for treating dry hair. When you soak, rinse, or spritz your hair with beer, its natural ingredients coat each strand and lend hair-nourishing benefits. In addition to B vitamins, the proteins found in malt and hops are said to repair damaged hair and boost overall body. Meanwhile, the maltose and sucrose sugars in beer tighten the hair's cuticles for enhanced shine. Beer can act as an excellent conditioner for hair, particularly dry hair.

* In general, chemicals are widely used for treating grains, wheat and hops. Therefore, beer prepared from these ingredients may contain traces of chemicals. Use of such beer on a regular basis should be avoided. In case, you experience irritation on your scalp after its use, then you should avoid beer hair treatment.