Thursday, February 28, 2013

Classic Looks that Never Go Out of Style...

Yes, It's Thursday! Tonight is my Zumba night which I look forward to every week :) If you haven't tried a class, you should go!

So yesterday for work, I decided to rock some red lips. They always look great and it is a pop of color that catches everyone's attention. Red lips go way back to the earlier years with the classic pin-up girls who showed their strength through rockin' red lipstick. In fact, there are several looks that throughout the years have not gone out of style, and are able to be worn by most everyone. Here are some classic looks that will never die:

A Flawless Matte Finish: Using the right combination of foundation, concealer, and pressed powder will ensure that you look picture perfect. Make sure to moisturize your face, then use concealer to hide any blemishes or dark circles. Next, apply foundation and powder for that  flawless finish!

Cat-eye Eyeliner: This classic makeup look is one you can be creative with. It’s fun to do and looks great for just about any occasion. The key to a great cat eye is a great eyeliner (try using a cream or gel liner) and creativity :)

Defined Eyebrows: Having a set of dark and defined eyebrows can make your makeup look polished and accentuate the eyes. Even throughout Old Hollywood years, most of the starts had a well-defined and dark brow.

Rosy Cheeks: After applying your face makeup, use a rosy-color blush on the apples of your cheeks. This will give you a nice glow and balance out your vintage inspired makeup look. Try and think of a beautiful porcelain doll, but just make sure not to go too crazy with it!

Wednesday, February 27, 2013

DIY Detox Bath...

Happy Hump Day everyone :) Today's blog is coming kinda late in the day, but I had a very busy day today work-wise :) So lately the weather here has been gloomy, dreary, grey, and COLD! It is suppose to get colder over the weekend, I think in the 40's. Am I still in Florida?

When the weather is like this, I like to relax inside my house and do anything to make me feel warm and cozy. Something that is really relaxing is to take a detox bath to sort of clean your system of any toxins you carry with you throughout the day. By encouraging the body to efficiently flush out toxins, we will not only boost our health and well-being, but also strengthen our immune system and prevent disease.Here is a great way to make a detox-ing night :)


  • Take 2 cups of epsom salt and mix it in a tub full of water.
  • Make sure you get the bath water as hot as you can stand it. Remember, we are looking to create a nice sweat.
  • If your bath water is not filtered, add 1 cup of baking soda as this helps neutralize the chemicals, primarily chlorine.
  • Immerse yourself in the water as much as you can (the top of your neck!) You want as much of your body underwater as you can. Relax and soak in the tub for at least 20 minutes.
  • Once you are done soaking, rise out of the tub very slowly and cautiously. You may feel a little dizzy and light-headed, this will go away as you shower off quickly in cool water.
  • It is important not to use harsh soaps or shampoos as your pores are open and will just absorb the chemicals found in those products.
  • Once dry you can apply a natural moisturizer like shea butter or coconut oil. Try not to put on any lotions, perfumes, or deodorants with scents, dyes, or chemicals.
  • Do not eat immediately before or after taking a detox bath.
  • Instead hydrate yourself with lots of WATER before and after.
  • Allow time after your bath to rest and rejuvenate.

Tuesday, February 26, 2013

DIY Dry Hair Treatments...

Hey there all :) I didn't get much sleep last night because my doggies kept me up, BUT I am not going to let that stop me for today's blog. I was thinking about it last night, that I have to schedule a hair appointment for a cut and blow-dry It has really been WAY too long since I got my hair cut, and unfortunately there are a lot of dead ends to show for it. My hair is naturally curly, and of course, I tend to wear it straight most of the time. This means lots of heat and flat ironing, which damages my strands </3

If you are like myself and you have dry, damaged hair, here are some at home treatments you can do yourself, without the salon!

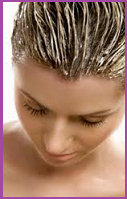
Mayonnaise – First you're thinking, mayonnaise in my hair?! It really works! Mayonnaise is naturally full of oil which helps the hair to shine. BUT remember, you don't want too much; just enough to cover the strands. Massage mayonnaise into the hair and cover with a plastic bag. Allow the mayo to remain for at least 30 minutes. Shampoo, rinse and follow with a shampoo if necessary. Repeat this treatment for dry damaged hair on a weekly basis until the desired results are achieved.

Deep Protein Conditioner – This treatment is especially good for dry, damaged hair. Combine 1 TBSP plain gelatin with 1 cup purified water. Allow the mixture to gel slightly, but don't let it set all the way. Add 1 teaspoon apple cider vinegar and if desired, 4 drops rosemary essential oil. Massage evenly into shampooed hair, leave on for 10 to 15 minutes, and then rinse. This formula really helps fortify and strengthen your strands. Repeat up to once per week, as necessary.

Olive Oil – Olive oil nourishes, conditions, and improves the strength and elasticity of your hair. Beat together 1 tablespoon extra virgin olive oil, 1 tablespoon vegetable glycerin and 1 teaspoon apple cider vinegar. Use the mixture on shampooed hair, and spread evenly throughout the hair. Wrap with plastic or a towel and allow to remain for 15 to 30 minutes. Rinse.

Thanks for reading everyone <3 If you enjoy reading my blog, I ask that you please click "Join this site" on the top left of the page so you will be labeled as a 'Follower' of my blog :) It would mean so much to me <3

Monday, February 25, 2013

Great remedy for achy muscles...

Hi everyone :) I just want everyone who is reading this to know that I appreciate your time and efforts you take each time you read one of my blogs. It means so much!

Ok, enough being sappy <3 If you are like me, your muscles ache every now and then. I don't know if it's because I'm just getting older, if I work out too hard sometimes, or if I have slept wrong the night before. Either way, nobody likes sore muscles no matter what they are caused by. Yes, there are many muscle creams out there like Bengay, Icy Hot, etc. but those tend to have such a bad smell to them.


The next time you have a sore muscle, prep to take a very warm/hot shower (as much as you can bare). The heat from the water will help your muscles to relax and de-tense. However, before getting in the shower, take your favorite moisturizing lotion (I like using coconut oil because it's so great for your skin) and warm it up. You can do this by either putting it on a radiator, heat register, or the safest way, setting it in a bowl of hot water (standing up). Once you are finished with the shower and your muscles are all relaxed, take the warm lotion and massage it into the area where the muscles ache. The warmth of the lotion will also help to relax any stress your muscles are having :)


Sunday, February 24, 2013

Sunday's Bible Verse...

Happy Sunday bloggers :) I wanted to share this beautiful verse with you today. Read and interpret it yourself and try to apply it to your everyday life <3


For I know the plans I have for you,” declares the Lord, “plans to prosper you and not to harm you, plans to give you hope and a future. Then you will call on me and come and pray to me, and I will listen to you. You will seek me and find me when you seek me with all your heart, Jeremiah 29:11-13

Saturday, February 23, 2013

DIY Bathroom Accessories...

Hi everyone :) I love Saturdays, you don't have to worry about waking up early or going to bed early. Except I always wake u earlier than I want because of my two silly doggies :P I usually bunker down and clean the house on the weekend. I try to do it on Saturday so Sunday I can actually rest :) Before I clean today though, I was thinking of different organizing projects I could do around the house to make it easier. If you are like me, your bathroom is mostly cluttered with makeup, cotton balls, Q-tips, you name it. Looking for a creative and cute way to store those nick-nacks? Check it out:

What you'll Need:
Candle Stands (any color of your choice)
Empty, clean jars with lids (mason jars, old candle jars, etc.)
Hot glue gun or super glue
Accessories to put in your jars


Take your candle stands and place them on a secure, flat surface. If you couldn't find the color you wanted, just spray paint them to the color you want :) Now take the empty jars you have and make sure they fit on top of the candle stick (some jars might be too big and won't fit properly on top). Glue the bottom of the jar securely on the candle stand and hold in place for about a minute, making sure it holds. To finish it off, add your accessories in the jars like Q-tips, cotton balls, or hair pins :) And enjoy!

Friday, February 22, 2013

4 Ways to Wear a Crop Top...

Happy Friday everyone <3 The weekend is here and soon it will have come and gone, but it's time to enjoy it while we have it :) I have been thinking a lot of Spring fashions. What will be in style, what trends will be hotter, and what colors will look best. A fashion trend that I have noticed might take a good hold on Spring is the 'crop-top'. These mid-drift showing shirts are cute enough to wear everyday or on a night out. If you are unfamiliar with these tops, they can be a little difficult to style. Here are four ways to wear a 'crop-top':


High-waist Skirt - When you are wearing a crop-top, you are trying to show off a little skin, and possibly some upper abs if you have them :) You don't want to show too much skin though, and a high-waist skirt is a perfect pair. It helps to cover up your belly button which doesn't allow too much skin to be shown. Remember you want to keep the outfit classy <3

Printed Pants - Pairing printed pants with a basic crop top makes for an eye catching duo. The printed pants have so much going on, whatever the print, that keeping a crop top basic and simple helps make the outfit. You can also pair this with some cute heels and you are ready to go :)

Blazer - Wearing a blazer over any crop top can help dress up the look. It can be a basic crop top or one with a design, but adding a blazer on top makes the look more sophisticated, while still showing some mid-drift and remaining sexy.

Distressed Jean Shorts - It seems like distressed jean shorts have been all the rage with many companies, especially ones with added detailing like studs or spikes. I typically like the jean shorts to be high-waist as well, to mimic the idea of the high-waist skirt (showing just enough skin).

Thanks for reading everyone <3 If you enjoy reading my blog, I ask that you please click "Join this site" on the top left of the page so you will be labeled as a 'Follower' of my blog :) It would mean so much to me <3

Thursday, February 21, 2013

Best nail colors for Spring...

Good Morning everyone! Spring is right around the corner; bird chirping, crisp air, flowers blooming, what's not to love <3 To be your best during spring, you need to look your best! This means from your hair, all the way down to your toes, wear your style with pride :) Something that I love when it's spring time is I get to paint my nails such bright, vibrant colors that help reflect my mood. If you are like me and you are looking for the top nail colors to wear during Spring, look no further :)


Pastel Yellow - You want to stick to a pastel as oppose to a bright neon yellow. Pastels will help add a fresh pop of color to your look without being too dramatic.

Lavender - Purple is one of my favorite colors, and I love to show it off on my nails when I can.

Coral - Coral's can make a big statement for Spring without having to go true red.

Gray (slate) Sparkle - This one seems a bit unusual, but the edgy look will help give us a great accent color.

Pearl Nude - Not everyone enjoys this color (I really don't), but it gives a slightly glossy appearance with some sparkle.

Lime Green - Try and stay away from neon's, but using a lighter green can pair perfectly with Spring.

Eggshell Nail polish - This could be any color of your choice, but with the birds chirping, who wouldn't  want to jump on the eggshell bandwagon?

Feather Texture - This one is new to the scene, but it works well with the whole 'bird's of a feather' :)

Dusty Aqua - One of my favorites, this lighter blue creates the perfect tone for your calm mood <3

Pale Peach - Typically used as a nude, this color gives the perfect color on tan skin!

Wednesday, February 20, 2013

Make your own perfume...

Happy Humpday everyone :) Today before work this morning, I sprayed on one of my current favorite perfumes, Nicki Minaj Pink Friday. It smells to fruity and girly, and it always puts me in a good mood. One of the most important things to me is smelling good. If a person finds your scent pleasant to be around, and associates that scent with you, then you are helping to enhance your image in that person's mind. Most of these processes are subconscious, as well, due to the very nature of memory and smell. Also, people who wear proper perfume and cologne are typically seen as more confident or professional, depending on the setting.

So how can we smell good without having to spend a lot of money on perfumes? Easy, you make it yourself! Here is a quick and easy way to create your own custom perfume that will have everyone flocking to you:


  • Your favorite smelling extract (mine is organic Vanilla) 
  • Your favorite smelling essential oil (Vanilla again for me, but there are many like Lavender, Orange, Lemon, etc.)

Blend these two ingredients together (equal parts) and put in an atomizer. Make sure to use a dark bottle because it protects the liquid from the light.

Tuesday, February 19, 2013

DIY 'Wake up' Scrub...

Happy Tuesday everyone :) It's back to school, back to work for everyone, and I really enjoyed the three day weekend. BUT, whenever there is a long weekend like that, it seems like it is a little harder to wake up and get back to the grind. I got used to sleeping in for an hour each day and not having to worry about going to bed at a certain time :P If you are having some trouble like me getting back into the groove of things this morning, here is a great 'Wake-me-up' scrub you can use in the morning that will definitely refresh your step!


1 cup sugar
15 drops peppermint essential oil
½ cup used coffee grounds from a freshly brewed pot
¼ cup olive oil
1 teaspoon pure vanilla extract

Mix all ingredients in a larger bowl and make sure they are all thoroughly combined. Take the mixture and transfer it to a tight-sealed container (could be Tupperware  a mason jar, etc.). To use, take a small amount on your hands and massage into your face. Make sure to avoid your eye area and mouth. By using these certain ingredients, your body and it's energy will react. For instance, peppermint increases alertness and decreases fatigue so we’re better able to direct our attention to driving. Coffee grounds still have caffeine in them, and what wakes you up in the morning will also wake up your face. Coffee grounds will give your skin a blast of caffeine to improve circulation of the skin and help promote healthier new skin at the same time. Gently massage it into your skin for a minute or two, then wash off with warm water. Store the remaining mixture in a cool place until ready to use. The scrub will keep for one to two weeks, and even longer if refrigerated!

Monday, February 18, 2013

How to pick an eye shadow...

Happy President's Day everyone :) One of the best things about today is all the President's Day sales that will be going on <33 I definitely have an itch to go shopping, just so I can see what kind of deals that are going on! Something I have been looking for lately to by is some new eye shadow  I want to make sure I pick a color that will compliment my eye color; this way, your eye color will pop and your eyes will be more noticeable. If you aren't sure about which eye shadows look better on which eye color, here is a list of each one:


Blue Eyes: Colors like brown, rose and violet families work best generally. They will contrast with blue eyes and make them stand out. Make sure to use shades that are darker than your natural eye color; use rich browns, golds, warm taupe's  soft peaches, lavender, lilac and fuchsia. If you try to use a similar blue shadow that is the same or very close to the natural eye color, it can make your eyes appear dull. Unlike wearing a 
blue shirt, blue eye shadow will not bring out the blue in your eyes. Just don't do it!

Brown Eyes: If you have 
brown eyes, you have a wide range of eye shadow colors to choose from. You can go with greens, golds, browns, pinks, blues, grays and purples. Earthy colors look great with brown eyes. Any shade of blue is going to look best with brown eyes. Cooler tones contrast well and make the eyes stand out. Choose a shade lighter than your eye color for a more natural and clean look; a shade dark you will appear more dramatic and sexy. Unlike blue eyes, brown eyes can get away with wearing brown 
eye shadow, but be careful because some browns can look muddy against your
 brown eyes!

Green Eyes: Violet and plum eye shadow shades are best. Warmer colors like deep purples, browns, mauve's  lilacs, and medium pinks are good. Try bronzes, golds, coppers, deep greens, peaches and apricots. Stay away from cooler colors like silvers, blues, whites and pastels. These can give you a washed out look. Earth tones like 
mocha browns and light greens look nice. Gold eye shadow also 
brings out any gold flecks you may have in your eyes.

Hazel Eyes: Hazel is the most versatile eye color. Shades of pale pink, light purple and sheer blush will look great with hazel eyes. To make them stand out, use deep greens, lavenders and shades with soft yellow undertones. To bring out any gold, choose gold-based eye shadows. To bring out green specks,  choose a brighter green shade like emerald and apply in three different intensities. To bring out the blue specks in your eyes go with purple in three different shades.Because you have eyes that are multiple colors, most of the eye shadow colors
 will look amazing!

Gray Eyes: Although gray this isn't a common color for eyes, I know that blue or green eyes can change to gray. 
Think 
of gray eyes as just pale blue or pale green eyes. Usually gray eyes will 
have undertones of green or blue or even flecks of those two colors. When picking out eye shadow, pick out the pale version of colors that look 
good on either green or blue eyes.

Saturday, February 16, 2013

Hottest Spring Fashions...

Hello everyone! It is definitely cold where I am, they say the coldest of the season! I'm not sure about you, but I'm excited for spring to get here and the weather to warm up :) If you are ready for spring just as much as I am, you want to make sure you know the hottest fashion trends to keep up with the styles! When I think about spring, I think about bright, vibrant colors, flowers, and legs galore <3 Here are ten of the hottest trends for this upcoming spring. Get ready!


1. Bright Dresses: Toss aside those sweaters and brighten up with a cute, vibrant sun dress :)
2. Graphic Leggings: Trade in those plain leggings for ones with design and style on them!
3. Straw Fedoras: This look always goes perfect with a graphic tee and big sunglasses.
4. Flouncy Skirts: No reason for mini skirts, these above the knee lengths are all the trend.
5. Bright Jackets: Pop a cute, bright blazer on top of any plain tee to spice up the look :)
6. Layered Necklaces: The more the better, but make sure one of those makes a statement!
7. Cross Body Bags: These are my favorite because of their convenience and style.
8. Flats: We all love our heels, but flats keep us looking cute and comfortable <3
9. Graphic Tees: Everyone loves to rock a shirt sporting a great saying or photo :p
10. Graphic Shorts: Instead of going for plain denim, pick a cute print to show off!

Friday, February 15, 2013

Secret remedies to burn fat...

Happy Friday everyone! Something that has been on my mind lately is making sure I do my taxes. Has everyone done them already?? If I get any money back, I would like to purchase a nice camera with video option. Then maybe I could incorporate some videos onto my blog :)

So even though it's Friday, I am not feeling very well. My stomach is acting up, and I haven't been wanting to do anything lately, especially exercise. If you are feeling the same way I am, and you just don't want to make the effort to go to the gym on a day you're not feeling well, here are some secret remedies that will help you burn fat :)


Eat an Apple!
Apples have an enzyme called pectin that can help in reducing the absorption of fats through the cells. Eating apples can also help in increasing absorption of water from the food items. This will help in reducing the fat content inside our body.

Consume Citrus Fruits!
Vitamin C rich fruits, especially citrus fruits like lemon, oranges, tomatoes, sweet lime etc. can be consumed in large amounts along with other diets which are found to be very effective in burning fat.

Take in some Dairy Products!
Following a diet of dairy products like milk, yogurt, cheese etc. is found to be significant in dissolving the fats and in burning the extra fat inside our body.

Eat a Nut you nut!
Eating nuts creates a sensation of being full as well as helps in burning the extra fat very effectively. Actually making sure to include nuts in our daily diets can prevent the problem of obesity and is one of the best remedy for weight loss.

Brave to eat Chilies!
Chilies are found to have capsaicin that helps in increasing the rate of metabolism which in turn helps in burning the fat from our body.

Try these out on days you are feeling lazy and your body will help burn the fat for you :)

Thursday, February 14, 2013

DIY Valentine's Blanket...

Happy Valentine's Day everyone! I hope your day is filled with smiles and love, not just from a significant other, but friends and family :) If you are still looking for a quick, cute gift to give a special someone, here is a great idea that is very inexpensive:

What you'll need:

  • An old blanket or throw
  • Paint that it suitable for cloth material (try Martha Stewart All Surface Paint)
  • A paintbrush or sponge
  • Sciccors
  • Cardboard
  • A cork from an old wine bottle

Start with cutting the cardboard into hearts, you can make the same size or many different sizes. Glue corks to the back of the hearts, to make it look like the heart is a stamp. Next, paint the front of the hearts with whatever color paint you would like, and begin to stamp them all over the blanket. You can do a pattern or just random designs. Let it dry for at least an hour <33


Wednesday, February 13, 2013

DIY Valentine's Chocolate Covered Strawberries...

Happy hump-day everyone :) I am trying my hardest not to get the mid week blues. Especially today because it's gloomy outside, I'm still sleepy, and I still have to get a lot of work done at the new house. BUT! I wanted to continue to share some Valentine secrets with all of you because it is right around the corner....tomorrow! Ah! If you are looking for a simple and elegant, romantic treat, chocolate covered strawberries are the way to go. Most people enjoy them (the others are nuts!) Here is a quick and simple way to prepare these for your Valentine:
What you'll need:
Fresh strawberries (try to get ones with their stems on)
Chocolate chips in white, milk or dark (whichever your preference, or get all three!)
Optional garnishes like sprinkles, nuts, etc.
A Ziploc baggie, empty

What to do:
♥ First you want to wash and thoroughly dry the strawberries (melted chocolate won’t stick to wet strawberries).
♥ In a microwave safe bowl, melt the chocolate you want to dip the strawberries in. Stir the chocolate about every 30 seconds to keep it from burning.
♥ Now the fun part, take the strawberry and slowly dip it into the chocolate (only about half way).
♥ If you are using chopped nuts or sprinkles as a garnish, you can roll the dipped strawberry in a small bowl of them to cover the chocolate.
♥ Place the dipped strawberry onto a piece parchment paper on top of a tray (this way the tray will catch all of the chocolate that drips off, and it won't go all over your counter!)
♥ For a fun idea, you can melt some contrasting chocolate in another bowl (white chocolate lets say), and place the melted chocolate in an empty Ziploc baggie. Take scissors and cut a very tiny hole in the bottom of the bag on one of the sides, and gently squeeze the bag of chocolate to drizzle thin lines over the strawberries.
♥ Refrigerate the strawberries until you are ready to serve, at least 30 minutes <33 Enjoy!

Tuesday, February 12, 2013

Strawberry Cookies for Valentine's Day...

Happy Tuesday :) So for some reason last night I had the biggest sweet tooth! I was looking for anything and everything with candy, chocolate, you name it! I was also trying to think of something sweet and flirty that I could make my hubby for Valentine's Day, something that won't break the bank but will still impress him <3 I found a recipe on Taste of Home that I thought was just the cutest, and wanted to share it with all of you. You can make this for your significant other, best friend, girls night, or a work party; everyone will love it!


What you'll need:
  • 2 cups all-purpose flour
  • 1/3 cup strawberry drink mix
  • 2 tsp baking powder
  • 1/2 tsp salt
  • 2/3 cup butter, softened
  • 2/3 cup sugar
  • 1 egg
  • 1 TBSP lemon juice

To make a glaze:
  • 1 cup (6 ounces) semisweet chocolate chips
  • 1 tsp shortening
Homemade frosting on top:
  • 1/8 tsp salt
  • 3 cups confectioners' sugar
  • 3-5 TBSP milk
  • 1/3 cup butter, softened
  • 2 TBSP strawberry drink mix (Nesquick)

Take a small mixing bowl, and cream the butter and sugar until light and fluffy. Whisk or beat in the egg and lemon juice. Next, combine the flour, drink mix, baking powder and salt in a separate bowl. Now gradually add the flour mixture to creamed mixture and blend well.

Roll out dough to 1/4" thickness onto a floured surface so it doesn't stick. Take any shaped cookie cutter (let's make it a heart for Valentine's Day) and start cutting your shapes out of the rolled out dough. Place your hearts on a greased baking sheet, making sure they are not too close together in case they spread as they bake. Bake at 350° for 8-10 minutes. Then let them cool for another 10 :)

In a microwave safe bowl, melt the chocolate chips and shortening. Make sure to stir it well until smooth. Spread this melty goodness over cookies, just covering the tops and let them sit so the glaze can set.

For an added bonus, you can add some homemade frosting on top :) In a small bowl, beat the butter, drink mix and salt until well blended. Slowly mix in confectioners' sugar, not too much at a time or else the sugar will fly everywhere! Slowly start adding the milk, tablespoon at a time, to achieve desired consistency.

Now it's time to decorate your cookies <333

Monday, February 11, 2013

DIY Valentine's Wreath...

Happy Monday everyone :) I hope your weekend was just as jam packed as mine was as I got two doggies included into my family <33 This week is the week for Valentine's Day! For those of you who are celebrating, whether it be with a significant other or a friend, I hope it's just as fun as you hope for. Typically during Valentine's Day, we get each other gifts and sweets to make each other feel appreciated and special. BUT! Whenever the big day arrives, it always seems that I get a blank as to what gift to buy! If you are having the same problem and don't know what to get, here is a cute DIY that anyone would love :)

Supplies:
A foam or wire wreath
Your favorite pictures of the two of you
Some glue or a hot glue gun
A pretty ribbon to hang the wreath

First, take the ribbon and tie it around the top of the foam wreath. This way you will have a way to hang it once you are done. No need to glue the ribbon down, just loop it through and make a bow at the end, leaving enough space to hang it on a door or wall. Next, take your favorite pictures, it could be the two of you or people that you both love, and start to glue them to your wreath, just on the front of the wreath. The back of the wreath will either be against a door or a wall and you won't get to see it anyway. If you don't want to use glue, you can always use pins and carefully pin them to the wreath. Make sure these are copies of pictures so if you mess up, you don't ruin the only copy of that photo you have!. Glue/pin them around the wreath till the whole front side is covered. And voile! you have a beautiful photo wreath as a gift :) You can also buy different shapes for the wreath and purchase a heart shape for Valentine's Day <33


Friday, February 8, 2013

How to shape your brows...

TGIF everyone! I love the ending of the work week, simply because the weekend is here :) So this morning as I was getting ready for work, I noticed that I finally have my eyebrows shaped to where I want them. They are easy to fill in when I am getting ready, and I really don't have to shape them everyday. Here is a great way to prepare your brows as you would like them:


The best time to shape eyebrows is right after a hot shower. Your pores will be open, and your hands will be cleansed. You also want to make sure to sit close to a mirror with very good lighting (especially to get any blonde hairs you cannot see!)

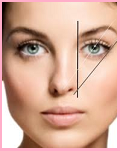
First, use some sort of eye pencil on your brows to help define what shape you want them to be. Place the pencil next to your nose and point it straight up to the sky (the start of your eyebrows should start in line with the pencil). Then, place the pencil at the edge of your nose and line the top up with the corner of your eye (this is where your eyebrow should end).

Start by plucking one row of hair at a time, beginning at the front of the eyebrow. The goal is to keep each brow looking balanced. Remember, you can always pluck a little more, but you can not put more hair back on. Don't go tweezer crazy! If you can, try not to pluck an arch. Aim for a continuous line to elongate the brow and make it appear fuller.

Look sideways into the mirror to see the line of the brow - this is a good way to judge that you are plucking well without taking off too much hair. The thinner they are, the harsher the brow looks and this will make you look older.

After plucking, comb the area with an eyebrow brush. Finish by running a cold cotton pad over the brow, or some aloe vera gel! This will help cool the area and close the pores and slow the blood supply.

Thursday, February 7, 2013

No more bed head...

It's Thursday! Which means it's almost Friday! My days and weeks have been pretty hectic lately. Not only did I move at home, but I also moved office buildings at work, and my birthday just recently passed. With all the busy schedules I have to follow, I barely have time to mess with getting ready. Something that makes it super easy in the morning is if I don't have to worry about my hair. But how do you go to bed without waking up with bed head?! Here are a few tricks and tips for waking up with a great head of hair:

  • After the shower or before you go to bed, spray in a volumizing spray which lifts the hair shaft as it dries and makes hair look thicker. 
  • Pull it all into a high pony at your crown and twist the tail-winding it onto itself to create a loose bun. Make sure it's not too tight, or else it can prevent the hair from drying all the way through but also could lead to breakage (especially if your hair is relaxed). 
  • With a few long bobbies, pin the bun in place. 
  • In the morning, let your hair down and finger comb (using a brush creates frizzies). 

  • After the shower or before you go to bed,  put a light mousse in your hair from roots to ends to help hair hold its shape as it dries. 
  • Divide your hair down the middle with a comb, separating it into two equal sections. 
  • Braid each side from the middle down. Starting any higher will create crimps near your roots. 
  • Secure the end of each braid with a metal-free elastic. 
  • Pull out the elastics or pins in the morning and unwind your hair. For a beachy effect, mist a salt spray all over your hair and scrunch with your hands.

  • After the shower or before you go to bed, apply a light leave-in conditioner and use a wide-tooth comb to distribute it to your ends. A brush or a fine-tooth comb can destroy your curl pattern and create kinks. 
  • Part your hair down the middle and divide each side into three smaller sections. 
  • Starting at the bottom of your hair, make a pin curl by wrapping the ends up and over two fingers as you would a foam roller and continue winding up toward your roots. (This prevents curls from tangling or catching on your pillow at night.) 
  • Slip your fingers out and secure the pin curl to your scalp using a clip. Then repeat steps three and four on the other five sections. 
  • Remove the clips in the a.m. and lightly spritz your hair with water to soften curls and eliminate static. 

Wednesday, February 6, 2013

DIY Valentine's Peanut Butter Cups...

Happy Wednesday everyone! Yesterday was my birthday and I had an amazing time with my family :) One thing my day was filled with was sweets <3 I could eat candy and chocolate all day if I could! Especially with Valentine's Day coming up, most of everyone's day will be filled with delicious treats :) One treat that is easy and quick to make for Valentine's Day is a Peanut Butter Cup. Mold it into a heart, and you have a Valentine's Peanut Butter Cup :) Here is how to make it:

One bag of Hershey kisses
One tub of peanut butter (your favorite)
One silicone mold of hearts

First, melt the chocolate in a microwave safe container, stirring every 20 seconds to make sure the chocolate is smooth. Make sure not to over heat which could burn the chocolate. Fill the heat molds about half way with the chocolate. Next, take the peanut butter and spoon in a teaspoon right over the chocolate you recently poured in (you can always melt the peanut butter a little to make it a little easier to pour). Last, fill the molds the rest of the way with the remaining chocolate you have left. You want to make sure you fill the molds to the top. Pop them in the fridge and wait for them to set (a couple hours). When set, they should be able to pop right out :)


Monday, February 4, 2013

Best Romantic Scents...

Happy Monday all! So the weekend has come and gone and mine was pretty hectic, as I could not update at all :( But it is February and we are getting closer to Valentine's Day <3 It is one of my favorite holidays and I love doing crafts and ideas to enhance the holiday :) If you have someone to celebrate it with, or if you are looking to attract someone, there are certain scents that help enhance the 'romantic' mood.  You can use oil warmers to spreads these scents throughout the house, use them as a perfume, or just light a nice candle! Here are some of the top scents that will help enhance your Valentine's Day:


Cinnamon: The bark of the cinnamon tree is used around the world as flavoring for both sweet and savory dishes as well as an aromatherapy agent for relaxation. It is also considered useful for producing “heat” within the body, cinnamon has been measured to increase appetite, both physical and sexual.

Vanilla: Though it may be the plainest flavor when it comes to ice cream, it seems neither men nor women can resist the smell of vanilla. The scent of vanilla has been shown to excite both men and women. It calms the nerves and soothes the spirit to get you right into the mood.

Almond: The aroma of the almond is known to arouse women particularly. For a seriously sensual experience, try massaging your partner with almond scented lotion or massage oil. They will melt in your hands.

Lavender: This is an evocative scent that is soothing to the heart. It relaxes and balances with its comforting aroma. Use it to heal and nurture a relationship and sooth the mind.

Jasmine: An erotic scent, heady and exotic, used to capture, sustain or rekindle the affections of a loved one. It promises deep and lasting affection. It brings strength and warmth to a sexual relationship.

Lime: This sounds like a weird one, but lime is an evocative scent that adds cheer and laughter to romance and increases the appetite for desire and passion. Lime fills the atmosphere with joy and lightness. It eases anxiety and clears the path for communication.

Friday, February 1, 2013

Cheap beauty tricks...

So I totally missed Thursday's blog and I'm so sorry! My house has been keeping me so busy with moving and unpacking, I couldn't find time to get on here. Today's post is going to be fun. With all of my moving, my wallet is slowly depleting! So I am trying to save money anywhere I can, even with my makeup. Here are some quick and easy tricks you can use to save some extra cash when it comes to beauty:

  • Instead of buying blush, use a dab of lipstick you already have.
  • When you're chap stick is running low, place the closed stick in a mug of warm water and let it sit for 10 minutes. The heat will melt any gloss on the sides of the container and you’ll have more to use.
  • If your eyeliner pencil is too soft and crumbling, pop the pencil into the freezer for 15 minutes before applying.
  • Tired of your lipsticks? Create a new shade by cutting off pieces of two old sticks (or scraping out the remnants of the tube) and melt them together in the microwave. Then apply with your finger or a brush.
  • Use a thin layer of non-toxic white Elmer’s Glue as a makeshift pore strip. Just like when you peeled it off your hands as a kid, spread a thin layer on your face, let it dry, and peel off. BE CAREFUL and keep clear of eyes.

  • The next time you find yourself in a Starbucks, pick up a few extra napkins–they’re well-known as awesome blotting sheets.
  • Use a credit card to get the most from your mascara: Hold the card against your lashes and swipe mascara over the other side for a perfect coat.