Happy day fellow bloggers! So I have figured out that one of my weaknesses include Black Friday/Cyber Monday deals....who would of thought?!
All of the good sales, deals, gift sets, etc. go up for grabs around this time of year, and I can't seem to keep my hands off them :) I wanted to share a little bit of the items I bought and give my opinion about what I have reviewed so far.
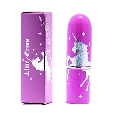
Limecrime lipsticks: This was my most exciting purchase, mainly because I have never tried any product from Limecrime, and from what I know you cannot purchase their products at a store, only online. They are also a bit pricey, so when Black Friday was offering 30% OFF, I jumped at the chance to pick up some! They go on very creamy and are extremely pigmented. They are also pretty long lasting from my first couple of tries with them <3
Tarte Amazonian Clay Blushes: Now because I am getting married in April, I have been trying to find makeup items that will last me most of the day. When it comes to blushes, I have heard nothing but great things about these Tarte blushes. What do you know? They DO stay on 12 hours! I have tried them to and from work, and I get home with still-rosy cheeks :)
Anastasia Brow Wiz: I picked this up because first, I love eyebrow pencils, and second because everyone and their mama raves about this product. Paying $21 for a brow pencil is a bit expensive considering I use it everyday. I do have to say it does give very good shape to the eyebrows, and it enables you to control how much color you put down. The negatives about it is it's a wind up pencil, and for some reason mine came broken into pieces. hence, when I wind it up too much, my broken piece falls out, sorta like a wind up mechanical pencil you would get from school. Bummer :(
To see all the products and reviews of my haul, click the video below <3
Merry Christmas everyone :) I hope everyone is having a great holiday and you are feeling all the love in the world. I recently picked up a Maybelline Color Tattoo and I hadn't seen this color used in any tutorial. The shade is Pomegranate Punk, and I would describe it as a cranberry, rusty color...so beautiful! I combined it with Bad to the Bronze Color Tattoo and added a bit of purple to the crease. If you aren't familiar with the Color Tattoo's, Maybelline describes them as their:
Ink technology creates 24HR wear shadow for our most intense, long-lasting color saturation
Cream formula glides on without creasing and keeps color vibrant
Ophthalmologist-tested. Safe for sensitive eyes and contact lens wearers
I own several shades, and they are always a good base to put on the eyelid for color. make sure to set it with a powder shadow to prevent creasing and you are good to go :)
So today's tutorial is really based off of a YouTube video I watched from Pixiwoo. If you don't know who they are, they are two fabulous makeup artists in the UK who do a phenomenal job at makeup looks. Here is there channel (Pixiwoo)
Samantha from Pixiwoo did a tutorial on how to make eyes appear larger using makeup, and how to make them appear smaller using makeup. She did one eye with each technique and compared the two. It was pretty funny at the end of the video, because her techniques worked so well that her face looked lopsided!
I thought the idea was very intriguing, as I typically only do techniques to make my eyes appear larger. Doing a comparison side by side, I could definitlely tell the one eye I used the darker makeup on looked smaller than the other. It's such a strange illusion, but it works! What do you guys think?
Happy Saturday all my beauties! Today's post is a makeup look that would be perfect for any upcoming occasion: holiday parties, outings, dates, etc. These colors work beautifully on ANYONE, but golds and browns especially work well with blue and green eyes....wow!
I picked up a new Maybelline palette, Give Me Gold. I believe the palette has been around for a while, and when I saw the colors in it, I said to myself...jackpot! hehe
The palette comes with four colors: a silky champagne-white, a yellow gold with shimmer, a copper-bronze with gold shimmer, and a chocolate brown with a little bit of gold shimmer. The shades work beautifully together which is something I really enjoyed. Sometimes you pick up a palette, and either the colors don't all work well together, or you only end up using some colors but not all. I think this look came out so amazing, and I will link the tutorial for you here. Enjoy! <3
Hello beautiful's! Fall is almost over, ending December 21. Can you believe it?!
Fall is my favorite time of year, the weather changes, the scenery gets even more beautiful, and some of the best holidays arrive :) In honor of my love for fall, here are a few things I specifically love during the fall time:
Marshmallow Fireside Candle from Bath and Body Works!
Ello everyone! So it is the end of November, and I'm in a panic about Christmas gifts! Has anyone completed their shopping already? I haven't even started!
There were a couple products that I have been flocking to for the month of November, and I wanted to share those with you today <3 I will list a couple here, and for the full list, I have it up on YouTube :)
♥ Wet n Wild Lipstick - Stoplight red
This lipstick I used in a Halloween tutorial for a pinup girl. If you haven't seen it, I will leave the link here: Pinup Girl. It is a classic, bright red that gives such great color payoff. It is a Wet & Wild lipstick, so the formula is very drying (I hate that!) but with a gloss on top, the lips look amazing <3
♥ Maybelline Color Tattoo Pressed Pigment - Improper Copper
I have been a fan of the Color Tatto's since Maybelline put them on the market. They always have such vivid colors and they are great for a eyeshadow base. I saw they put pigments out, and I am always all about pigments. If you don't know what a pigment is, it's a loose powder product that can be used as eyeshadow, highlighter, or mixed in with lip gloss, nail polish, lotion, and many other things to create new shimmer/colored products. The color I picked up goes great with blue eyes, and it really makes them pop!
♥ Covergirl Outlast Nailpolish - Wine Stain
Covergirl nail polishes have really surprised me lately. The formulas are fantastic, and the color selection is so beautiful. I wanted a fall type color, so I picked up Wine Stain. It is a deep, dark purple/maroon with no shimmer. I have been wearing it on and off throughout November, and I can't get enough <3
♥ Yes to Blueberries Facial Firming Moisturizer
I have been trying bits and pieces from the Yes To line, and recently picked up the Yes to Blueberries Firming Moisturizer. For being a firming product, it doesn't feel like my skin is tightening. However, the smell is amazing, and after I put it on at night, I wake up in the morning and my skin looks great.
Hi my lovelies! Today's post is a positivity post that deals with self esteem. EVERYONE has trouble with self-esteem, especially in today's society where most magazines and models seem to look perfect. Why can't we be perfect too? No flaws? Wrinkles? Perfect butt?
If you know you don't have good self esteem, there are some techniques you can try to raise your confidence in yourself and in who you are. So:
What is self-esteem? Self-esteem is how we value ourselves; it is how we perceive our value to the world
and how valuable we think we are to others. SELF ESTEEM IS A STATE OF MIND. What causes low self-esteem? Negative Emotional Responses
Criticism
Teasing
Punishment
Poverty
Failure
Race
Religion
The media, culture and sex
How to I gain positive self-esteem?
Set realistic goals for yourself: Know your strengths and weaknesses; don't be a perfectionist!
Celebrate your achievements: Most of the time when we do something right, we don't give ourselves enough praise! Got a good grade? Celebrate with friends! Wearing a cute outfit? Rock it like you're on the runway! Get a compliment? Embrace it and self affirm! You are beautiful!
Trust in your own gut: Dont' let others influence how you feel. You are who you are, no excuses needed!
Take it slowly: Practice makes perfect. You aren't going to gain self esteem over night, but keep reaffirming yourself that you are great and you can do great things and eventually you will believe it :)
Happy Thursday my fellow beauties <3 I wanted to bring a smokey makeup look for you that I was recently inspired by from a Wet & Wild palette, Silent Era Film. I know I just did a copper makeup look for you guys, but when I saw this palette at the drug store, I had to pick it up and try it out! The colors are so beautiful; very fall appropriate, and easily wearable for a day or night smokey eye <3
The trio contains a shimmery blue-charcoal for the lid, a matte orange-coral-red for the crease, and a shimmery purple-pink for a highlight. I fell in love with the combination of these, as most of the time I just use a brown neutral in my crease area.
The pigmentation of these are great, as most of the Wet & Wild palette's are. If you have never tried them, they are extremely affordable products with great color payoff. They do tend to have a little bit of fallout so just be aware of that. I hope you enjoy the look! <3
Hello fellow beauties <333 I come to you today with a makeup look, yay!!!
I have been wanting to do a makeup look using copper for the longest time. I am in love with how the color looks on the skin, and how much it can bring out someone's eye color, especially blues and greens!
I have seen a couple other YouTuber's do these copper looks, and I just had to try it out myself. I unfortunately don't have any fancy copper pigments, so I had to use what I already own...the ELF Little Beauty Book: Python Edition!
Let me tell you, for being ELF, these eye-shadows show up beautifully <3 I used the copper color primarily over the lid, and kept some darker browns in the crease. I also brought the copper color under the eyes to really accentuate the eye color, as well as using a brown liner for my water line :) Lastly I finished it off with a black gel liner on the upper lash line. Let me know how you think it came out!
Hello beautifuls <3 Thank you for stopping by and viewing my blog :)
Today's post will be a review for a new mascara I picked up....
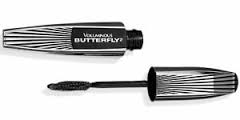
Voluminous® Butterfly Mascara!
Here is some information regarding the product:
How to Use: Place brush at base of lashes and gently sweep up to tip—no need to pump the wand. Removes easily with soap and water.
Description: Stretch and extend your lashes like wings! Introducing Voluminous Butterfly Mascara, one of our most-exciting mascara innovations, yet. Its revolutionary Butterfly Brush™ with asymmetrical lash line shape extends and lifts outer corner lashes to give you a winged-out effect, instantly volumizing lashes at the roots and stretching lashes outward. The unique Cocoon Fibers™ instantly wrap lashes in a soft, delicate veil to create silky, spectacular lashes that flutter.
Ingredients: AQUA / WATER / EAU • PARAFFIN • POTASSIUM CETYL PHOSPHATE • CERA ALBA / BEESWAX / CIRE DABEILLE • COPERNICIA CERIFERA CERA / CARNAUBA WAX / CIRE DE CARNAUBA • ACACIA SENEGAL / ACACIA SENEGAL GUM • GLYCERIN • CETYL ALCOHOL • HYDROXYETHYLCELLULOSE • PHENOXYETHANOL • PEG/PPG-17/18 DIMETHICONE • STEARETH-20 • PHENYL ETHYL ALCOHOL • SODIUM POLYMETHACRYLATE • PROPYLENE GLYCOL • RAYON •HYDROGENATED JOJOBA OIL •HYDROGENATED PALM OIL • PENTAERYTHRITYL TETRAISOSTEARATE • SILICA • DISODIUM EDTA • POLYQUATERNIUM-10 • SOLUBLE COLLAGEN • PANTHENOL • SODIUM CHONDROITIN SULFATE • ATELOCOLLAGEN [+/- MAY CONTAIN / PEUT CONTENIR • CI 77491, CI 77492, CI 77499 / IRON OXIDES • CI 77007 / ULTRAMARINES • MICA • CI 75470 / CARMINE • CI 77891 / TITANIUM DIOXIDE • CI 77510 / FERRIC FERROCYANIDE]
After having a chance to use it, I have given it a rating of 4 1/2 stars. I love the formula because it is not a very dry formula. I also am in love with the wand. Here's why: the bristles, especially towards the end of the wand, get longer and longer. When you coat your lashes with the mascara, you really don't need to force it on at all, or even get the wand too close up against your eye! The long bristles reach even the tiniest lashes and coat them beautifully. The only reason I deducted a half of a star from the review is the formula tends to clump after two uses, which I am OK with, but I know some people are not.
This year was my first attempts at Halloween makeup looks, so I decided to go with three:
1950's Pin-up Girl
Zombie
Vampire Vixon
I tried to think outside the box and incorporate both the sexy and the scary! They were all so much fun to make, not only because I get to do something out of the ordinary, but I really tested myself on some of the skills I have learned over the past year of watching YouTube tutorials. I think for my first year of doing Halloween looks, I didn't do too bad of a job.
Hello happy bloggers :) Over these past few months, I have purchased several items for fall! I think fall is my favorite season; there is a chill in the air, I get to buy everything that feels comfy and cozy, and the deep reds, purples, and browns really accentuate my features <3 Woo hoo!
During my haul, I went to multiple stores: Target, LUSH, Bath & Body Works, Sigma, Walmart, and Shop Lately. I will list a couple of my favorite items and how they have been working for me so far! Here goes:
LUSH Lovely Jubblies Description: Take care of your finest features with Mother Nature’s finest ingredients. Inspiring men and women alike, our rather brilliant breast cream is packed full of tightening meadowsweet infusion and firming tiger lily petals to help fight the forces of gravity. We add heaps of beeswax and organic oils of almond and avocado to soften your melons and keep them supple. Smooth a generous amount over your décolletage area and leave your cleavage smelling like a fresh floral bouquet of orange blossom, rose, jasmine and ylang ylang.
I have been really enjoying this product more than I expected. I put it on every night after the shower, but I am sparing with it because it was such an expensive product for the amount they give you. It makes me smell like a fresh bouquet of roses, and I love it <3
Sigma's E25 Blending Brush Description: Blend colors together onto the lid with added control. Buff out harsh lines for a well-blended effect.
It's funny, I didn't think a good quality blending brush would make that much of a difference, but it really really really does! It helps the eye-shadows blend into whatever you want to make of them, and you really don't have to put so much effort into the brush. I will say though that after a few uses, the brush is not as tapered, and seemed to have fluff out a bit. I mention this because it makes it a little more difficult to focus on an exact spot to blend (specifically for me since I have small, hooded eyes). I think I will be purchasing a smaller blending brush to hit those targeted areas :)
Sigma's E30 Pencil Brush Description: Soften pencil liners along the top and bottom lash lines, add shadow to line the eyes, or use to highlight inner corner of eyes.
I tried going so long without purchasing a pencil brush, and I'm not sure why. Everytime I would go into a drug store I would look for one, and I never had any luck. This brush is SO amazing for getting color into your outer-v area as well as making a clean cut crease....LOVE IT!
Essie's After School Boy Blazer Description: it's back to cool when you're back in blue-black. this academy blue lacquer is the prep-school chic must of the season. DBP, Toluene and Formaldehyde free.
This color is so beautiful on, simply because it is so dark and deep of a blue. I didn't think I would like it as much as I did, but for me I think really dark colors look good on my nails compared to my pastey white skin, lol! I feel like the dark colors have a bit of an edge and sophistication at the same time :)
To see the rest of the items purchased, here is the video of the entire purchase:
Good Morning and happy Monday my fellow bloggers :) Today I wanted to share with you some mini-reviews on random products I have finally emptied out! I enjoy watching videos and reading articles about reviews of products, so I can make a better informed decision about spending my money, don't you? Here are some products I have purchased, fully used up, and my opinions on them:
Equate Makeup Remover Wipes (compared to Nuetrogena wipes): This product was an impulse buy because I needed more makeup remover wipes, but I wasn't in the mood to spend a fortune on them. I decided to go with the cheaper brand (Walmart or Equate) and what a mistake that was. I used the entire packet because I spent the money on them, but the texture was so rough on the cloth, it almost hurt my face removing my makeup! Ouch!
Batiste Dry Shampoo: This is a definite favorite of mine. It works fabulous when I am on two-day old hair. However I do want to mention it does leave a white cast when you apply it, so make sure you spray and then comb through to remove any white marks. I have already repurchased another one!
ELF Makeup Setting Spray: This was another impulse buy, and I wanted to be a little more frugal with my money, so instead of purchasing another Urban Decay Setting Spray, I went with ELF. Unfortunately this product has not worked for me very well. However I will mention, I am continuing to use this product through the month in hopes that I will learn to like it. I have tried spraying it further away from my face then the package says to, and so far it seems to be OK.
Garnier Fructis Color Shield Shampoo and Conditioner: I bought this duo when I initially got my highlights to help shield the color a little longer. I had no complaints about the products, but there was also nothing amazing to say about them either. I did not use this duo everytime I washed my hair; I rotated with my Moroccon Oil Shampoo & Conditioner.
Tarte Lights, Camera, Lashes Mascara: This product I absolutely loved in the beginning; it really separated my lashes and gave them great length. I did regret buying it though, because the product dried up within the month! Most of my drugstore mascara's last over 5 months, so wth!
Maybelline Precision Eyeliner Pen: This product also worked well in the beginning, however it was another one that dried up really fast. When I would apply it to my upper lash line, it would give good color payoff and then dwindle into nothing. I would have to trace back and forth several times to make sure my entire lash line got covered....no bueno!
Maybelline Define-a-brow Pencil: This product was so aggravating, simply because the pencil was so soft that it broke everytime (and I mean everytime) I applied it to my brows. Just filling it one eyebrow, the pencil would break 3-4 times..argh! When I eventually finished filling in my eyebrow, it looked great though :)
Urban Decay Eyelid Primer Potion: This was the sample size and I loved it simply because it worked. I don't think I would spend the money to buy a full size, just because there are so many other alternatives that work just as well for a cheaper cost :)
Bath & Body Works Room Spray: Yum!! I love how these smell up my house and that the scent seems to linger throughout the day <3 Already bought another one :)
Happy Tuesday fellow bloggers :) I hope everyone's week was off to a great start. I recently was given a gift (thank you mama!) and it was a new ELF Palette that is a dupe for a Nordstrom Palette they recently put out. Here is the comparison:
Pretty close, right? The advantage of the ELF Palette is that is also includes three mini brushes, one which somewhat mimics the new NARS Contour Brush:
So many think that a Smokey Eye should only be for nightitme, but you can tone down smoky eyes so that they're daytime appropriate; it just comes down to color technique. The beautiful pairing of gray and mauve shadows is possibly the prettiest look of the season. Substituting gray or brown for black instantly makes a smoky eye more subtle—just keep the shadow close to your lid. Here is a link to my tutorial. Let me know if you try it out! xo
Happy Thursday, beautiful's ♥ Since the month of August is over, I wanted to share with you some of my favorites products that I have been loving for the entire month!
♥ Maybelline Big Eyes Mascara: This was a recent mascara I reviewed and I have not been able to put it down! The formula is somewhat liquidy which I enjoy in a mascara, and it is very build-able if you wanted to layer on coats. I still stick to my guns in saying the bottom wand is conveniently small, but I don't think it picks up very much product (so several coats might be necessary).
♥ Loreal Visible Lift Concealer: This concealer is very similar to Maybelline's LUMI concealer/highlighter pen. It has a very smooth, creamy consistency, and pretty good coverage in general. I would stay away from using too much of it, because after a while I do notice creasing. But a light layer does the trick :)
♥ MAC Fix+ Skin Refresher: This was a splurge for me this month, but I have somewhat dry skin, so I tend to get the cake-y look even when I am not trying. The Fix+ is not a setting spray, but it works as a skin refresher that you can use throughout the day to keep your makeup looking like you just applied it :)
♥ Loreal True Match LUMI Foundation: I am late on the bandwagon with this foundation, but I wanted to give it a try since it is suppose to leave that dewy finish. Works great for me so far and I was very surprised on how many options are are given at the drugstore for colors and shades. I like the finish more when using a Beauty Blender, but a brush works just fine too if that is your preference.
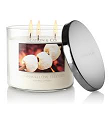
♥ Bath & Body Works Marshmallow Fireside Candle: This candle I am definitely OBSESSED with and I can't get enough of it. The description says, "Celebrate the changing season with a warm blend of toasted marshmallows, smoldering woods and creamy vanilla reminiscent of a cozy evening 'round the bonfire". Can I buy stock in a candle?????
♥ Bath & Body Works Leaves Candle: This was a new edition to my collection but I have been wanting to smell it forever! That sounds weird, LOL, but it's so true; every time I went to the store last year to buy it, it was sold out :( I finally got my hands on it and it is a perfect 'fall' smell. The description says, "Celebrate the brilliant colors of autumn with this rich blend of golden nectar, red apple and spiced berries". YUM!
Happy hump day fellow bloggers :) Today's blog is a little different, in that I am going to talk about what it means to be kind. It seems simple but many of us aren't as kind as we should be most of the time, and the negative effects of the world really influence that. As long as acts of kindness don’t become obligatory or overwhelming, they can enrich the giver and the whole community.
Altruism (including kindness) is key to the social connections that are so important to our happiness. Research finds that acts of kindness—especially spontaneous, out-of-the ordinary ones—can boost happiness in the person doing the good deed.
Reasons why acts of kindness make people happier:
Being generous leads us to perceive others more compassionately; we typically find good qualities in people to whom we are kind
Being kind promotes a sense of connection and community with others, which is one of the strongest factors in increasing happiness
Being generous helps us appreciate and feel grateful for our own good fortune
Being generous boosts our self-image; it helps us feel useful and gives us a way to use our strengths and talents in a meaningful way
Being kind can start a chain reaction of positivity; being kind to others may lead them to be grateful and generous to others, who in turn are grateful and kind to others
So why be positive?
♥ Emotions like gratitude/appreciation help athletes perform better.
♥ Positive leaders make better decisions under pressure.
♥ Positive people have more friends, leading to happiness/longevity.
♥ Marriages and relationships are much more likely to succeed.
♥ Regular positive emotions increase longevity by 10 yrs.
♥ Positivity provides a broader perspective & see the big picture.
With all of this said, go out into the world and be kind. Maybe it will pay off :)
Watch my other positivity videos:
Positive Thinking http://youtu.be/dJak1V4kNeQ
Positive Attitudes http://youtu.be/sPxezX2wBkU
Stay Positive While Studying http://youtu.be/hnU0SPfGskg
"Three things in human life are important: the first is to be kind; the second is to be kind; and the third is to be kind." - Henry James
Good Morning, beautiful! Thank you for taking the time to stop by my blog ♥
Today's post is going to be a review on a new Maybelline product that recently came out, Maybelline's Big Eyes Mascara. The unique feature about this mascara is that is has two wands on it, one for your upper lashes and one for your lower lashes. Awesome, right?
If you aren't familiar with mascara's and their ordinary features, they typically have only one wand that you are suppose to use for your upper and lower lashes, however sometimes the wands are so bulky and big that the lower lashes are hard to apply. Hence some cosmetic companies specifically put out mascara's that are only meant for your lower lashes, which means they can hike up the price.
After having the chance to try it, I would rate it a 4½ stars out of 5. The formula was very easy to work with and stayed very liquid and smooth through the entire application. I typically apply two coats just to give my lashes a little more length, and after doing so, the formula did not clump. The smaller wand for the lower lashes was also very easy to use and made to fit into the little crevices of your eyes where the lashes tend to me very small. Both wands are held together in the middle of the package which makes it very easy to hold and work with throughout your application.
The only reason I would deduct a ½ a star is for the lower wand. Don't get me wrong, it works very well because of its' size. However I feel that because of how small it is, it does not seem to pick up much product on the brush itself. Because of this, I really have to push hard into my lower lashes to get product on them, and I run the risk of smudging on my skin below.
All in all, it is definitely worth giving it a try, whether you are looking for a new mascara or if you are just a mascara junkie like me and enjoy trying all types of different ones :) xo
Hello fellow bloggers :) I hope everyone's week is off to a great start. Before I get into the blog, I want to thank everyone who is reading my posts. It means so much to me that you take the time out of your day to view my thoughts and opinions about different subject matters, and for that I am GRATEFUL. If you are at all interested, I also have a YouTube channel if you would also like to see any videos I post on a weekly basis (Shannon B)
So one beauty product that everyone seems to talk about is Coconut Oil. What is Coconut Oil? Coconut oil is an edible oil extracted from the kernel or meat of matured coconuts harvested from the coconut palm. Some of the beauty items coconut oil can be used for are:
→ Skin and hair hydration
→ The prevention of stretch marks
→ Creation of natural body and face scrubs for gentle exfoliation
→ Gentle makeup removal
Not only for beauty benefits, coconut oil has many health benefits as well including:
→ Contains lauric acid that is essential for heart health
→ Assists digestion
→ Speeds up weight loss
→ Helps to fight infections
→ Improves liver health
With all of this said, coconut oil has many benefits both physical appearance and our inside health. The next time you are at the store, pick up some coconut oil and try out this favorite recipe for a DIY Face Mask:
2 teaspoons of coconut oil
1/2 mashed ripe avocado
1 teaspoon oat bran.
Mix into a paste and apply to skin. Leave on for approximately 20 minutes. Rinse with warm water.
Happy Monday fellow bloggers :) Thank you for stopping by to read today's post, and I hope you are all having a wonderful start to the week. If not, don't worry, we're only on day one of this week.
Lately I have been really trying to take care of my skin, not only with my skin care routine, but with the things I eat. Part of what keeps our skin healthy is what we put into our bodies, and most of the time, we are not getting the right vitamins and nutrients to show our skin at its' best. Here are four vitamins that are excellent for the skin and what you can focus on maintaining in your diet:
► Vitamin A
Vitamin A is proven to reduce wrinkles, fade brown spots, and smooth roughness. You can find vitamin A,also known as retinoids, in many beauty products. You can usually find Vitamin A in lotions, night creams and prescription products.The best way to use it is at night, as they can make your skin more sensitive to sun. Retinoids can be very powerful, so avoid irritation by applying every second or third night initially and build up to nightly use.
► Vitamin B Vitamin B boosts hydration, reduces redness and inhibits the transfer of pigment to skin cells, therefore minimizing dark spots. It is specifically beneficial for people with dry or sensitive skin, and some studies support its benefits for reducing rosacea. It can be found in lotions, creams, and serums, and the best way to apply it is in the morning and evening. It’s also great to apply both Vitamin A & B simultaneously, as Vitamin B could calm possible irritation from retinoids, and the combination is said to provide even greater anti-aging benefits.
► Vitamin C Vitamin C helps smooth and firm skin and fade brown spots by inhibiting the free radicals that trigger wrinkling, sagging, and other aging changes. Mainly it can be applied in the morning, before sunscreen, to protect your skin from free radicals caused by sun damage.
►Vitamin E Vitamin E is really the skincare superstar. The vitamin has been proven to ease dryness and boosts skin's UV defense. You can mainly find it in sunscreens and after-sun products.Vitamin E is a natural armor against UV radiation, so apply the product before and after sun exposure. Also consider applying Vitamin C and E simultaneously, as the duo provides greater protection against free radicals when used together.
Good Morning all bloggers! I have some big news to share with you all....
I'M ENGAGED!
It happened on July 1st, and I couldn't be happier!!! :):):) <33333 Now is the big process of planning a wedding, yikes! I have been googling ideas like a mad woman, mostly because our budget is low and I would like to be as crafty as I can with the event.
A great DIY that I found recently are diamond tooth picks, and you initially might think, huh?! These can be not only for a wedding but for a blinged out party or even a fun girls night. Here are the steps involved:
What you'll need:
Flat head toothpicks Fake diamond cut accents from Michaels Hot Glue
Lay your diamond on a flat surface and turn them upside down. Take your toothpick and add a drop of hot glue to the flat end side. Stick the hot glue end of the toothpick on the upside down diamond and hold it straight up for several seconds, making sure it dries. Now you can have appetizers that bling and sparkle across the room! :)
Happy Monday and July 1st bloggers :) I can't believe it, but half of the year is already gone....where did it go?!?!?! Within this week, our country will once again celebrate it's independence on the 4th of July, and many of us like to be extra-patriotic :) Here are some outfit ideas (going from top to bottom) to get your creativity going :) ALL of these pieces you can find at Forever 21 @ www.forever21.com <33
The first outfit is an American Flag sweater shirt that can give a little more warmth for those who are going to be in cooler weather. It can be paired with jeans with stars on them, and red striped flats that give a nautical theme almost. Pair it with a cute patriotic ring and you're done! :)
The second outfit helps display your love for the USA as it has a flag within the word 'Love" <3 This can be paired with cute jean shorts that also resemble the American Flag, and these pair well because the top doesn't have too much of a design to clash with the shorts. Black flats would go well with this because of the shirt, and an American Flag dog tag finishes the look! <3
The third outfit is my favorite and gives off more of an edgy look. The shirt is black and white, and had really large arm holes. Because of this, pairing it with a cute bandeau underneath can add a great pop of color to the outfit (keeping with the USA theme, make it red or blue). The distressed jean shorts help keep that edgy look along with the black boots. Adding the bracelet with the American Flag star helps feminize it up a bit :)
The last outfit is if you are going to a dinner party or night out that you want to dress up a little bit, but still be patriotic! This cute white peplum top has black stars all over it, and paring it with high waisted black faux leather shorts helps keep the dressed-up look. Adding some cute black heels to it like these just complete the classy-ness of it, and remember to include some American Flag hair pins to show your USA pride :)
Happy Monday beauties :) My Monday has not been a very good start; I slept wrong and my neck has a big creek in it :X I think I should recommend to my boss that I need a personal masseuse at my desk :) HA!
So the month of June is almost over...can you believe we are already half way through the year? Wow! My honey and I have been trying to be vegetarian for the month of June, not because we think meat is bad, but we were looking for ideas to be more creative with fruits & veggies <3 It has been a success so far, and I wanted to share that there are actually some fruits and veggies that make you lose weight! These are called 'negative' calorie foods because they burn more calories eating them than it takes to consume them. Use this list to try and think of some creative meals yourself :)
Veggies:
Celery: Celery is 95% water, very alkaline & filled with fiber. It also has blood pressure reducing properties.
Cucumbers: Cucumbers are 95% water, keeping the body hydrated while helping the body eliminate toxins.
Green beans: the lean vegetables are a very good source of vitamins, minerals, and plant derived micronutrients.
Spinach: The high amount of vitamin A in spinach promotes healthy skin by allowing for proper moisture retention in the epidermis, thus fighting psoriasis, keratinization, acne and even wrinkles.
Zucchinis: aids in digestion, prevents constipation, maintains low blood sugar and curbs overeating.
Onions: contain flavonoids, which act as antioxidants, and have immune-enhancing properties.
Carrots: contain vitamin A and a host of other powerful health benefits including beautiful skin, cancer prevention, and anti-aging.
Fruits:
Peaches: contains just 68 calories and no fat.
Pineapples: loaded with vitamins and minerals including vitamin A, vitamin C, calcium, phosphorus, and potassium.
Watermelons: contains vitamin A, which helps maintain eye health and is an antioxidant; vitamin C, which helps strengthen immunity, heal wounds, prevent cell damage, promote healthy teeth and gums; and vitamin B6, which helps brain function and helps convert protein to energy.
Cranberries: full of antioxidants, which protects cells from damage by unstable molecules called free radicals.
Blueberries: combat the free radicals that can damage cellular structures as well as DNA.
Apples: contains soluble fiber (4 grams per medium apple) for a modest amount of calories (95) makes apples a filling, sweet snack.
Grapefruits: high in enzymes that burn fats, has high water content and has less sodium. A combination of these three characteristics make grapefruit a perfect food for increasing your body’s metabolism.
Hello and happy Monday all my fellow bloggers :) This past week has been so hot here in Florida, and summer technically begins June 21! I don't know about you, but when the temperature outside rises, I hate to wear makeup that feels heavy and piled on. It makes me feel yucky because I can almost feel it melting off my skin!
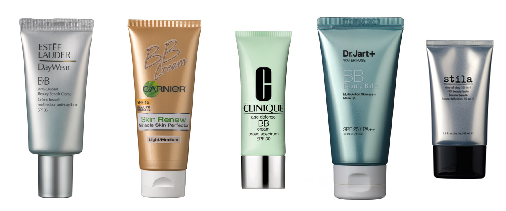
A great alternative for a foundation during the summer time is a BB Cream. BB Creams act like a tinted moisturizer, in addition to hydrating and evening out skin tones. BB creams also treat the skin with antioxidants or other anti-aging ingredients, plus offer broad-spectrum SPF. Who doesn't love those benefits :) Here I will list my top 5 BB Cream picks for summer:
Estée Lauder Daywear Anti-Oxidant Beauty Benefit Creme SPF 35: This BB Cream is specifically for those who have oily skin. The oil-free cream stops shine, and moisturizes with hyaluronic acid. It doesn't leave the skin looking matte, but almost a slight glow to the skin. And since it's a BB cream, it's also got an anti-aging component (it contains antioxidants including vitamins E and C).
Garnier Skin Renew Miracle Skin Perfector BB Cream SPF 15:One of my favorites of all time, this BB Cream contains both hyaluronic acid and glycerin so it's very moisturizing for the skin. The light formula covers minor imperfections, is easy to blend over dry areas, and generally feels really nice. It also contains Vitamin C which helps brighten the skin.
Clinique Age Defense BB Cream Broad Spectrum SPF 30: This almost mimics a lightweight foundation. It contains caffeine to soften lines, and vitamin E and seaweed extract to control oil production, which will help your makeup stay on longer.
Dr. Jart+ Water Fuse BB Beauty Balm with SPF 25: If you have sensitive skin, this BB Cream might be for you. The delicate lotion helps neutralize redness, though it won't replace your foundation. Fragrance free, this BB Cream has a high water content makes it feel cooling, and aloe treats redness and soothes complexions.
Stila Stay All Day 10-in-1 HD Beauty Balm: This BB Cream would be great for more mature skin, as it contains very small micro-spheres that are supposed to reduce the appearance of wrinkle depth by 84 percent. It contains peptides to treat fine lines and wrinkles. Be cautious though, as this one does not contain SPF.
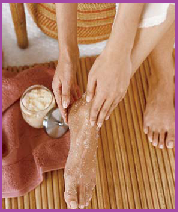
Hi to all my beautiful bloggers <3 Summer is almost here and I can already feel the warmth from the sunlight and smell the sunscreen coming from the beach! A big part of summer that I enjoy is getting to wear super cute sandals, ones that are both comfortable AND cute :) If you are like me and you enjoy wearing flip flops or cute-sy sandals, there is one thing you must remember: KEEP YOUR FEET LOOKING CUTE TOO! You shouldn't have your feet and toes showing if they don't look as cute as the sandals you are rockin'. How can we help achieve cute feet? Exfoliation :) Here is a great foot scrub you can try in the shower or during an at-home pedicure <3
Ingredients:
1/2 cup organic sugar
3 tablespoons olive oil
2 tablespoons honey
Container with lid
Clean stirring utensil
1. Measure out olive oil and honey into clean container. (measure the olive oil first so the honey won't stick to the spoon). 2. Add sugar. 3. Stir.
How to enjoy:
Rub all over your feet, heals, and toes for about 30 seconds to 1 minute. Rinse with warm water. For extra moisturizing, rub your feet with lotion after the scrub and put some of your favorite comfy socks on. The socks will keep the lotion on longer, and your feet will be able to soak up the benefits :)
Happy Tuesday everyone! Last weekend was Memorial Day Weekend, and I hope everyone celebrated it accordingly. Remember, we are the land of the free, BECAUSE of the brave :)
So today's blog is a little different. Summer is around the corner (officially begins June 21) so everyone is trying to prepare, whether it is with purchasing a new wardrobe, trying more natural makeup techniques, or getting a cute shorter hair cut :) BUT, what about our furry friends who also want to enjoy the change of season?? ♥♥♥
I don't know about you, but I love my doggies like children! So anytime I get the chance to spoil them, I do :) Not just with my love, but with goodies that are healthy and nutritious for them. If you are willing, here is a wonderful recipe for a cool, summer-y treat your favorite companion can enjoy ♥♥♥
Ingredients:
Plain Yogurt (try an organic brand like Stonyfield)
4 medium size Strawberries (also better if organic/remember you want them eating healthy things!)
1) Pour some yogurt in any mold of your choice (silicone molds are easier to pop treats out of). Only add enough yogurt in the mold to fill about 1/4-2/3 of the way full. Freeze it for an hour.
2) Blend the strawberries in a blender and add on top of the frozen yogurt. 3) Top it off with another layer of yogurt. Freeze it for an hour (or longer). Enjoy :)
Hello bloggers! :) I hope everyone had a wonderful weekend, and if not, I hope this upcoming one is much better <3 I was doing my usual cleaning the house this past weekend, and realized I am out of baking soda, gasp! This might sound weird and most people just use it to stick in the fridge, but there are actually many uses that can come out of baking soda. Lets explore:
☻ Clean your jewelry with baking soda! Scrubbing your jewelry with some baking soda on a wet toothbrush will really make them shine :)
☻ Are your teeth as white as you'd like? Use a little toothpaste, mix in one teaspoon baking soda, plus one teaspoon of hydrogen peroxide, and a 1/2 tsp. of water. Thoroughly mix then brush your teeth for two minutes. Repeat this once a week till you have desired results. Once your teeth are whitened, just repeat once a month!
☻ Stayed out in the sun too long? If you need to relieve a sunburn make a thin paste using water and baking soda. Gently apply to the burned area. ☻ Baking soda can be used as an exfoliant! Make a paste using 3 parts baking soda to 1 part water. Apply to your face with your hands and rub gently to slough off dead skin, and leave your skin with a glow. ☻ Ouch, I have muscle pain! To relieve aches and pains, mix 1 cup baking soda and 1 cup apple cider vinegar in a warm tub of water. ☻ For those who sweat, apply baking soda under arms for quick-dry antiperspirant! ☻ Make sure to wash your fruits and veggies! Clean pesticides off of fruits and vegetables. Add some baking soda to a sink of water and rinse your produce in it. ☻ Make that sports car shine :) Use baking soda to clean up the vehicle like you do the bathroom, it makes chrome sparkle as well as stainless steel.
Monday Monday, what a joyous day :P Back to work, school, or whatever your responsibilities are! I hope everyone has a great weekend and Mother's Day, whether you spent it with family or alone reading a good book :) I spent mine spending too much money on makeup, but I did get some new products to try out, so that was exciting!
This morning I noticed that one of my favorite mascaras (Lights, Camera, Lashes by Tarte) has dried out and it not working quite as well. I have not had it for that long and some mascara's that I have had for longer are still working great. Hmph! As expensive as Tarte's mascara is, you would think it would last as long as a drug-store brand >:o The good thing is there are different tricks you can do to try and revive your favorite mascara. Here's what do to:
Boil about 1 cup of water and place it in a mug or coffee cup.
Take your dried up mascara (make sure the lid is on nice and tight) and place it bottom first in the boiling water. Leave it for about three minutes. The heat of the water should melt the dried mascara inside the tube without adding anything to the mascara.
Use tongs or a towel to remove the tube of mascara from the hot water. Dry the outside of the tube. Unscrew the cap to check the condition of the mascara. It should be good to go :)
If your mascara is still somewhat dry after trying these steps, add one drop of baby oil to the mascara. Mix the baby oil into the mascara by inserting and removing the mascara wand five or six times. Make sure you don't mix too much, because pumping the tube in and out creates more air in the tube. Repeat steps one through three if the mascara dries out again. Avoid adding any more baby oil to the tube of mascara because it may change the properties of the mascara and make it unusable.
When you get to the point where you can't revive the mascara any longer, make sure to save the mascara wand and discard the rest. You can get a lot of uses out of the wand for future reference :)
Happy Monday my fellow bloggers and beauties :) So over the weekend, I went to the Container Store, and spent hours upon hours looking around. That store is so amazing, I could spend all day there! I was primarily looking for things to help me organize my makeup vanity. I ended up getting something to hold my eye-shadow palettes and a lipstick display case that holds up to 24. When I got home, I tried it all out, and I filled up the entire 24! Geez!
Having all those lipsticks, it made me think how each one is so different and should be applied with different techniques. Here are the main rules to live by (with any lipstick) when putting on that perfect pout:
Make sure your lips are clean: Try to exfoliate lightly with a toothbrush to remove any dead skin, and pat them dry. You don't want to put lipstick on chapped lips however, so if you are having that problem, use a little bit of lip balm, then blot most of it off (don't rub).
Know the lipstick formulas: Lipsticks that are matte formulas tend to be very dry, versus most creamy formulas that are really hydrating but don't last as long.
Wear a lip liner whenever you can: Using the same color lip liner as the lipstick helps to not only intensify the color, but it helps the lipstick to stay on longer throughout the day. Make sure when applying the lip liner, you outline your lips and then fill your lips in. If you only outline your lips, you will get that unsightly outline throughout the day if your lipstick needs touch up.
Blot the lipstick right after applying: Once you have applied your lipstick, you can blot right away by gently pressing a tissue right up against your lips. Don't put the tissue in between your lips and blot, because it will wear your lipstick off in an uneven way. After blotting, some women like to reapply a second coat for double long lasting wear. If you choose to do this, make sure you blot gently again after the second coat.
Make sure not to get lipstick on your teeth: Once you have finished applying your lipstick, put your index finger in your mouth, gently close your mouth over the finger, and pull your finger out. This will get any lipstick that was applied to the inner parts of your lip that could wear off on your teeth if your not careful!
Happy Monday bloggers :) I don't know about the rest of you, but I am feeling the Monday blues. Not so much sad, but just soooooo tired. Why do you do this to me Monday?!? :O I'm sure it didn't help that when I got to work this morning, our AC unit was broken, so the building was hotter than ever...yuck!
Speaking of hot, now that Spring is here and in full force, the weather in FL has started to heat up lately. I think all week it is suppose to be in the high 80's here, phew! I hate to wear a full face of makeup when it is that hot, especially because it feels cakey and piled on. Not only that, but it tends to slip off more, move around, and just look like a plain ole' mess on your face. So what to do? Here are some quick and easy makeup secrets for hot weather:
☼Always wear a primer! using a primer under your foundation helps your makeup to last all day. Look for a primer that contains silicone (the major ingredient in most long-wearing formulas), which will act as a super shield between humidity and your skin.
☼Pick the right foundation! As mentioned previously, silicone is a prime ingredient that helps makeup stay on longer; they are the very best option when met with moisture. Make sure to also see if it includes SPF, you don't want your face to burn!
☼A good concealer! Not only just with mascara, but especially with concealer, you want to choose a waterproof formula; this will hide dark circles and blemishes, even in extreme heat.
☼Mind your eyes! You still want your lashes to look fabulous, so let's make sure to wear a waterproof mascara and liner (if preferred). I always tend to skip the liner because I have smaller eyes, but if it is something you can't live without, go for it!
☼If you are one who has oily skin and you have to touch up during the day, use blotting cloths (I like these best from Neutrogena click here). Most days it is just easy to touch up with powder, but the hotter the weather, the cakier the powder will make your face!
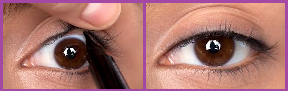
Happy Monday bloggers :) The weather has really been dreary lately, mostly cloudy and rainy...seems like FL Spring to me! (hehe) Today as I was doing my makeup, I really decided to make my eyes pop by tightlining under my top lashes. I didn't know about doing this trick until last year, and really only knew of lining the waterline. So why tightline?
Tightlining your eyes (or you could call it "invisible eye liner") is a great way to add definition to your eyes. Instead of lining the skin above your lashes (which many of us still have to master), you line between the lash line. This method is perfect for any casual or fancy occasion, and is super easy to master.
Step One: If you're a beginner at tightlining, using clean fingers, gently lift your lashes upward. You'll see tiny gaps between your lash hairs, which you'll be filling in with eye liner. Once you have become a expert at tightlining, you won't have to lift up your lashes and just simply draw on the line.
Step Two: Using your eyeliner, draw the eye liner directly under each individual lash (as close to the root as possible), to fill in your lash line. This technique helps to make your lashes look fuller.
Tada! Now you have officially learned how to tightline :) If you'd like to intensify the look, tightline your bottom lash line as well. It's the same concept as the top, but you'll be filling in the space between your lower lashes.
Happy Friday everyone :):):) It has been a little bit since I have updated on here, but I have been thinking of blogs to write and taking a little relaxing time for myself <3 This weekend coming up hopefully won't be too eventful, but I am suppose to have dinner with family and friends, which will be awesome :) I should also give my doggies a bath :x
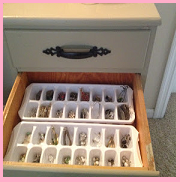
So lately I have been buying more and more earrings, and I am running out of room to store them! If you have this same problem, I have a quick and easy DIY solution: an earring drawer! Here is all that you need:
♦ An empty shelf in a night stand or a empty spot in a dresser drawer ♦ Cute ice cube trays
Take your favorite designed ice cube trays; they could be regular squares, or a cute design like hearts, stars, or smiley faces :)
Lay the empty ice cube trays in the drawers side by side, or however they will fit, and put a pair of earrings in each 'cube' slot. The slots keep all the earrings organized and easy to view when you are choosing which ones to wear <3
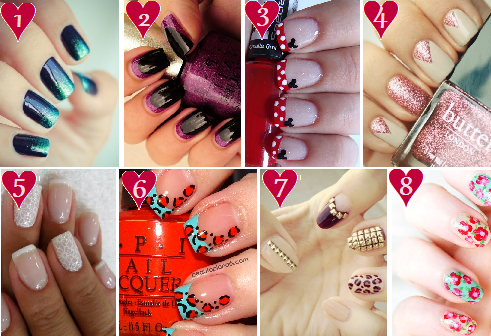
It's Hump-Day everyone! happy mid-week to you, and I hope this week is going well so far :) Today I wanted to post a fun blog about some of my favorite nail designs. I have been really into doing my own nails lately (just to save a buck), and there are some really cute nail designs that I have found on Pinterest to try and replicate on myself. If you don't know about Pinterest, it's a website where people can share and pin any and all favorites they have...makeup, hair, food, crafts, fashion, you name it. When I visit the website, I can seriously get lost for days just browsing through everything. Some of my favorite pins are those of nail designs, so here are my current top favorites!
1. Ombre:Any ombre nail is awesome. It seems like the darker the colors you use, the more of a 'twilight' effect it gives. Add a little glitter and it's like you're looking into the galaxy on your nails. Genius! 2. Dark:These dark nails are a bit different, as they have a pop of color on the bottom of the nail near the cuticle (most people put the color on the tip like a french manicure design). This design is not only different but it gives the nail a unique look to it. I'd say dark and sexy! 3. Event:Any kind of event you are going to, it is always a cute idea to design your nails to fit that event. This one is obviously going to Disney as they have little Mickey Mouse's on each nail. I like this because it also keeps it simple. You don't have Mickey's entire face over each nail, or any of the Disney character's walking all over your nails, it's a cute, simple, and chic design! 4. Glitter:Glitter in my book is always good, no matter what the design or color. Here they have also kept the pop of color on the bottom, but using a glitter polish. Most people tend to do one accent nail (the fourth finger here), but when you incorporate that pop of color through all the nails, it really brings the design all together. 5. Simple French: Most french designs always look chic and classy, but they can often be a little boring....no color, no design just white or pink. To spice it up a little, this design added a nail sticker design to the fourth finger. It still works with the theme because the design it also white, but it just adds a little something extra. This would be great to do for a formal event like a wedding! 6. Leopard:Sometimes using a leopard print can be too much on the nails. Most people tend to put the print all over the nail, which always seems like there is too much going on. This design used the classic french manicure but with blue tips instead of white. They also incorporated the leopard of the sides of each nail and using a pop of red. So cute! If this is still too much on the nail for you, you can always just add the print to one nail instead of all. 7. Studs:This is one of my favorite designs, not only because it's using purple, but it also incorporates leopard and studs! This design comes off very sexy and sophisticated. It has a sense of simple but stylish, and it matches my current cell phone case. Love it <3 8. Flowers:Now that spring is here, who doesn't love flower print?! There are so many flower designs you could use for your nails, but this one to me captures spring. Just beautiful :)